I wanted to build something similar to VMware vSphere, but using VMware Workstation running on my own machine. The idea was simple: instead of opening VMware Workstation every time I wanted to access a virtual machine, I wanted to manage and connect to my VMs directly from a web browser.
After looking at a few options, I decided to use Apache Guacamole.
Guacamole is an open-source clientless remote desktop gateway. It allows you to access remote machines through a browser without installing a remote desktop client on the computer you are connecting from.
For this project, I used Ubuntu, Docker, MySQL, Apache Guacamole, and Cloudflare Tunnel. I also wanted to make it accessible from outside my local network without exposing my home IP address or opening inbound ports on my router. Here is how I put everything together.
1. What I used
Before starting, here is the environment I used:
Component	             Version or configuration
ServerOS	             Ubuntu
Container platform	   Docker
Container management	 Docker Compose
Apache Guacamole	     1.6.0
guacd	                 1.6.0
Database	             MySQL 8.4
Public access	         Cloudflare Tunnel
Domain	               abhimanyuneupane.com
Public hostname	       remote.abhimanyuneupane.com
Webport	             8080
I already had VMware Workstation installed on my Windows machine, with Windows and Linux virtual machines available.
The Ubuntu server runs the Guacamole containers, while the virtual machines are the systems I want to access remotely.
2. Install Docker on Ubuntu
The first thing I needed was Docker because I wanted to keep the installation simple and manage everything through containers
sudo apt update
sudo apt upgrade -y
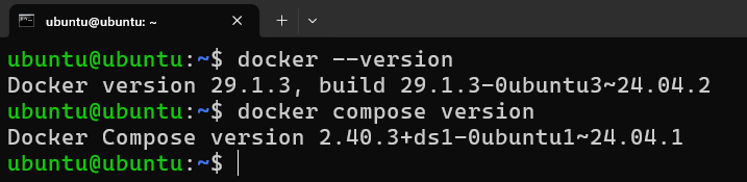
Install Docker and Docker Compose using the official Docker installation instructions. After installation, check that Docker is running:
docker --version
docker compose version
If both commands return version information, you are good to continue.
3. Create the Guacamole project directory
I wanted to keep all the configuration files in one place instead of scattering them across the server. Create the project directory:
mkdir -p ~/guacamole-lab
cd ~/guacamole-lab
Create the configuration directories:
mkdir -p config/extensions
mkdir -p config/lib
The project structure will look something like this:
guacamole-lab/
│
├── compose.yaml
│
├── initdb.sql
│
├── config/
│   ├── extensions/
│   └── lib/
│
└── mysql_data/
The database directory will be managed by Docker through a named volume in the Compose configuration.
4. Prepare the MySQL database
Guacamole needs a database to store user accounts, connection information, and other configuration data.
I decided to use MySQL 8.4.
One important thing I learned during installation is that Guacamole does not automatically create the required database tables. We need to generate the SQL initialization script first.
Run:
docker run --rm \
  guacamole/guacamole:1.6.0 \
  /opt/guacamole/bin/initdb.sh --mysql > initdb.sql
This generates the SQL script required by Guacamole. You can check whether the file was created:
ls -lh initdb.sql
Keep this file inside the guacamole-lab directory. We will use it when initializing MySQL
5. Configure Docker Compose
Now comes the important part.
Instead of running Guacamole, guacd, and MySQL separately, I wanted to manage everything from one Compose file.
Create the file:
nano compose.yaml
Use the following configuration as a starting point:
services:

  mysql:
    image: mysql:8.4
    restart: unless-stopped
    environment:
      MYSQL_ROOT_PASSWORD: CHANGE_ROOT_PASSWORD
      MYSQL_DATABASE: guacamole_db
      MYSQL_USER: guacamole_user
      MYSQL_PASSWORD: CHANGE_DB_PASSWORD
    volumes:
      - mysql_data:/var/lib/mysql
      - ./initdb.sql:/docker-entrypoint-initdb.d/initdb.sql:ro

  guacd:
    image: guacamole/guacd:1.6.0
    restart: unless-stopped

  guacamole:
    image: guacamole/guacamole:1.6.0
    restart: unless-stopped
    depends_on:
      - mysql
      - guacd
    ports:
      - "8080:8080"
    environment:
      GUACD_HOSTNAME: guacd
      MYSQL_ENABLED: "true"
      MYSQL_HOSTNAME: mysql
      MYSQL_DATABASE: guacamole_db
      MYSQL_USERNAME: guacamole_user
      MYSQL_PASSWORD: CHANGE_DB_PASSWORD

volumes:
  mysql_data:
Replace the example passwords with your own strong passwords.
Make sure the MySQL password in both services is exactly the same. The root password is separate.
A quick explanation of the containers:
- MySQL: Stores users, authentication information, and connection configurations.
- guacd: Handles the actual remote desktop connections.
- Guacamole: Provides the web interface that users interact with. The three containers communicate through Docker's internal network. There is no need to expose the guacd port publicly.
Save the file and exit.
6. Start the containers
Now start the environment:
docker compose up -d
Check the running containers:
docker ps
You should see the Guacamole, guacd, and MySQL containers running.
Check the logs if something does not start:
docker compose logs -f
You can also check individual containers:
docker compose logs guacamole
docker compose logs guacd
docker compose logs mysql
 Ignore the cloudflare docker for now
7. Access the Guacamole web interface
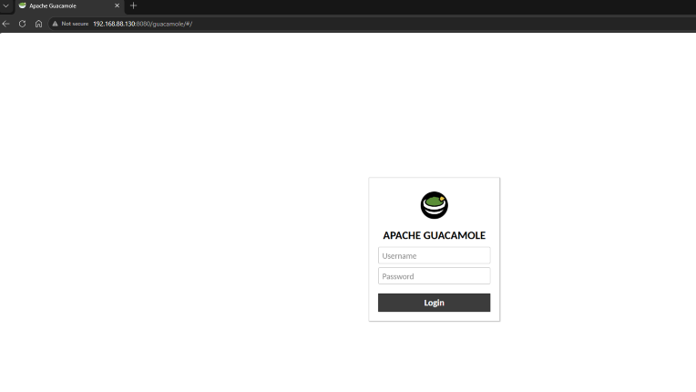
Once the containers are running, open a browser on your local network. Go to:
http://UBUNTU_SERVER_IP:8080/guacamole/
You should see the Apache Guacamole login page.
The default credentials created by the MySQL initialization script are:
Username: guacadmin
Password: guacadmin
Log in and change the default password immediately.
8. Configure a remote desktop connection
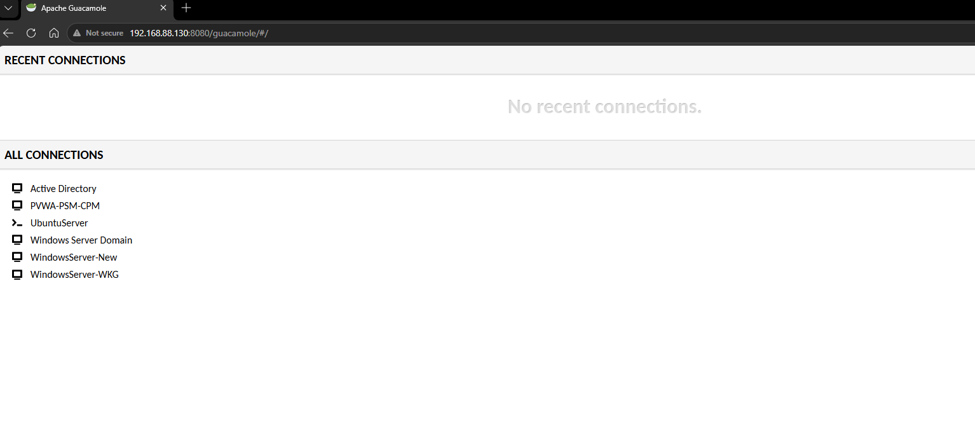
Now that Guacamole is running, we need to connect it to our virtual machines.
In my setup, I already had VMware Workstation running on my Windows machine. Both the Ubuntu server running Guacamole and my target virtual machines were configured with NAT networking.
Since they are on the same virtual network and can communicate with each other, there is no need to install an additional VNC server.
For Windows virtual machines, I use the built-in Remote Desktop Protocol (RDP).
- Configure Remote Desktop on Windows
- Start your Windows virtual machine.
- Open Windows Settings.
- Navigate to System and then Remote Desktop.
- Enable Remote Desktop.
- Make sure Windows Firewall allows Remote Desktop connections.
Find the VM's IP address by running:
ipconfig
Make a note of the IPv4 address.
Add the connection in Guacamole
- Log in to Guacamole.
- Open Settings.
- Select Connections.
- Select New Connection.
- Give the connection a name.
- Select RDP as the protocol.
- Enter the Windows VM's NAT IP address.
- Set the port to 3389.
- Enter your Windows username and password.
- Save the connection.
One important thing is that the Ubuntu server must be able to reach the Windows VM over the NAT network.
You can test connectivity from Ubuntu using:
ping WINDOWS_VM_IP
You can also check whether the RDP port is reachable:
nc -zv WINDOWS_VM_IP 3389
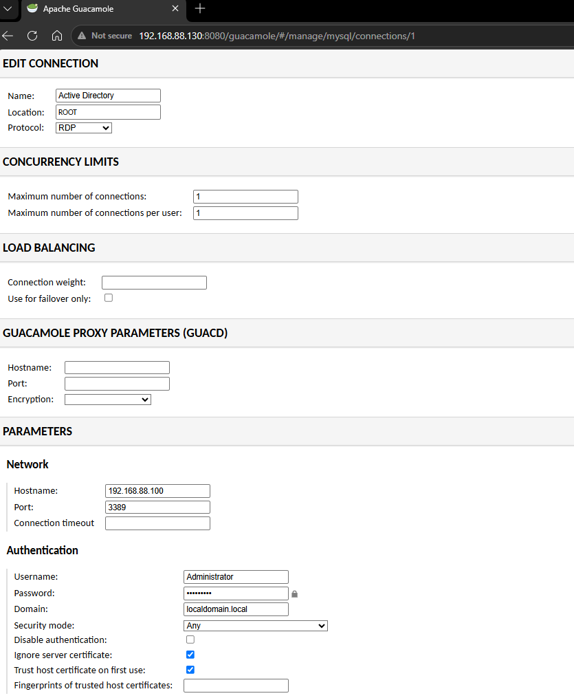
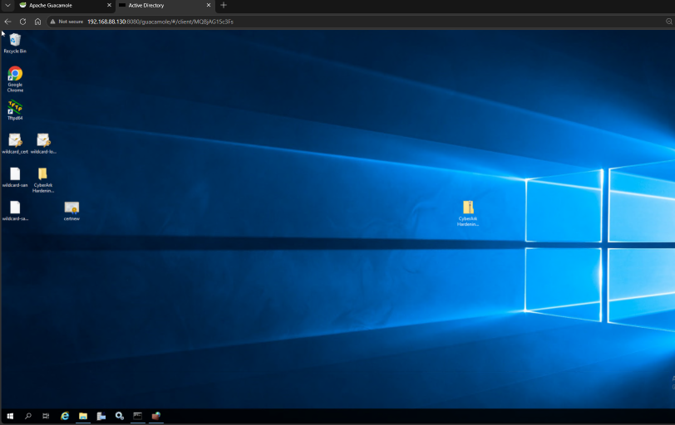
If the connection is successful, open the connection from your Guacamole dashboard.
You should now be able to access your Windows virtual machine directly inside your browser.
For Linux virtual machines, you can configure SSH connections using the same approach, provided SSH is enabled on the target machine
9. Set up Cloudflare Tunnel
Now for the part I was most interested in.
I wanted to access Guacamole from anywhere, not just when connected to my home network. I already had my personal domain managed through Cloudflare, so Cloudflare Tunnel was a good option.
The main advantage is that I don't need to expose my public IP address or configure port forwarding on my router.
Instead, cloudflared creates an outbound connection from my Ubuntu server to Cloudflare.
Cloudflare then routes incoming requests through that tunnel to my local application.
Create a tunnel
Log in to your Cloudflare dashboard. Navigate to:
Networking → Tunnels Then:
- Select Create Tunnel.
- Give the tunnel a name.
- Select the Docker environment.
- Create the tunnel.
- Copy the tunnel token provided by Cloudflare.
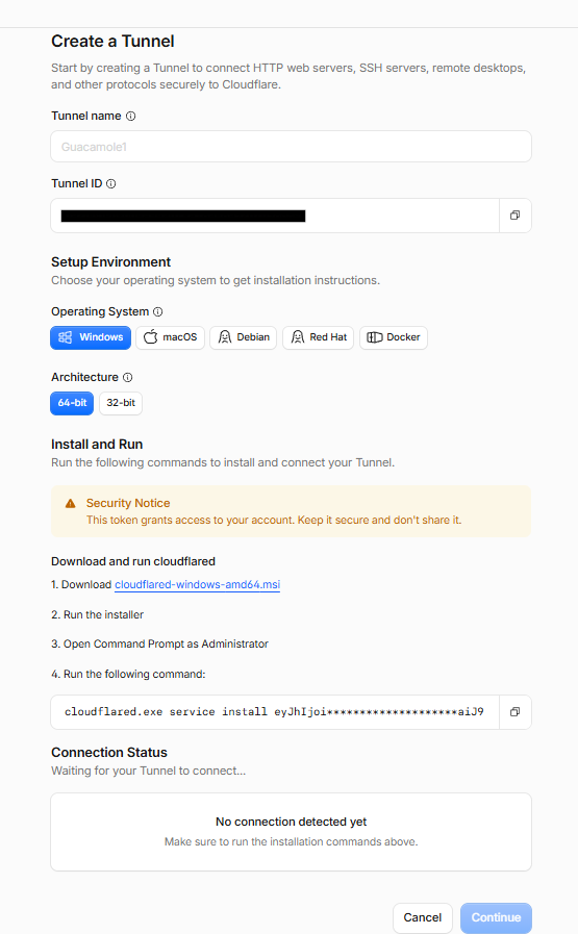
Keep this token private. Anyone who obtains it may be able to run your tunnel. Configure the public hostname
Open your newly created tunnel.
Go to Routes and add a published application route. Use these values:
Setting  	Value
Subdomain --> remote
Domain --> abhimanyuneupane.com
Type --> HTTP
Service --> http://localhost:8080
The resulting public address will be:
https://remote.abhimanyuneupane.com
Save the configuration.
Cloudflare will handle the DNS routing for the hostname.
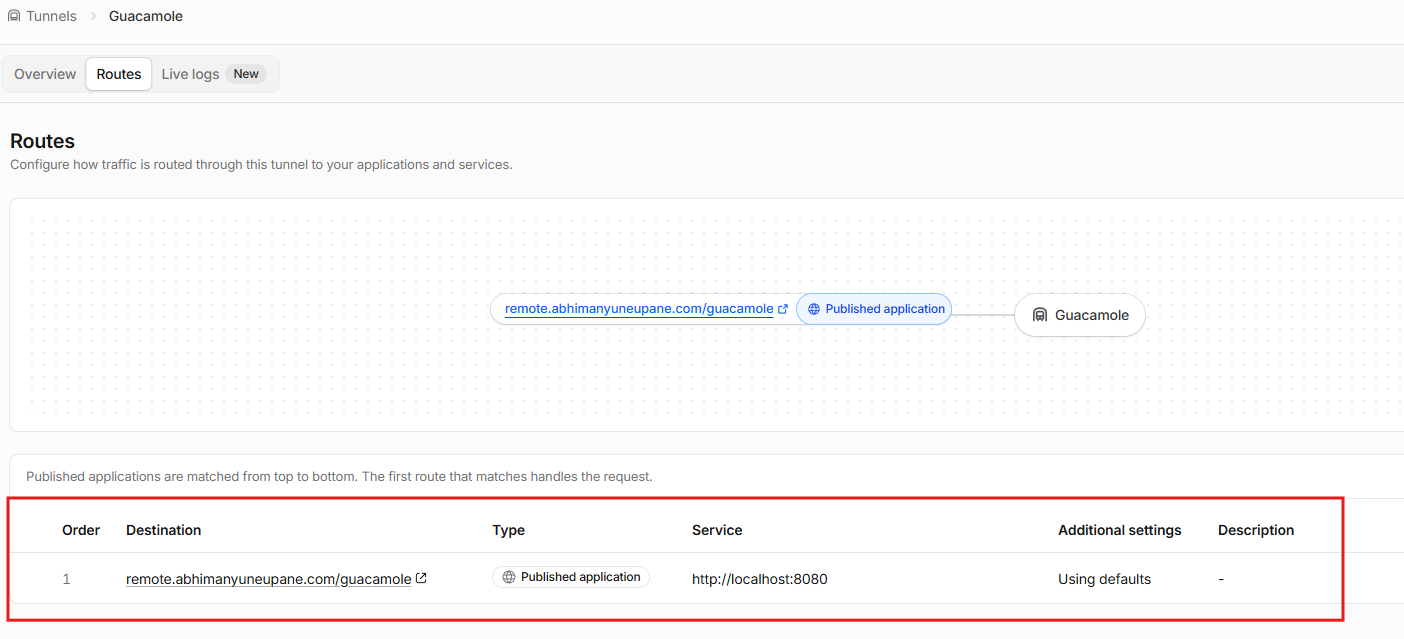 This is after creating tunnel, you'll see another page
10. Run Cloudflare Tunnel using Docker
I decided to run cloudflared as another Docker container so that it would be easy to manage alongside the other services.
Since my tunnel was configured to use the local Ubuntu service on port 8080, I used host networking for cloudflared. Run:
docker run -d \
  --name cloudflared \
  --restart unless-stopped \
  --network host \
  cloudflare/cloudflared:latest \
  tunnel --no-autoupdate \
  --protocol http2 \
  run --token YOUR_TUNNEL_TOKEN
Replace YOUR_TUNNEL_TOKEN with the actual token from Cloudflare.
Check whether the container is running:
docker ps
Check the tunnel logs:
docker logs -f cloudflared
You should see messages indicating that cloudflared has established connections to Cloudflare.
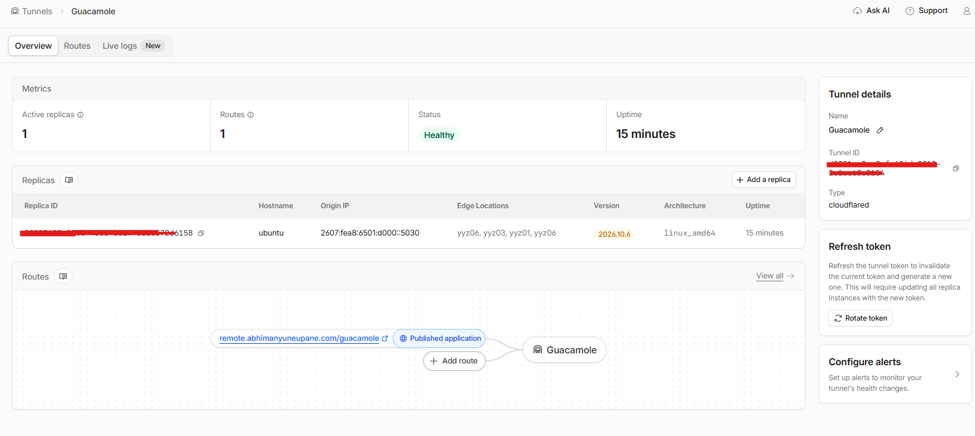
11. Test public access Now open a browser from another network, such as your mobile data connection. Visit:
https://remote.abhimanyuneupane.com
You should reach your Guacamole login page.
If everything is configured correctly, you can log in and access your virtual machines without connecting to your home network first.
This was the main goal of the project: having browser-based access to my VMware Workstation virtual machines from anywhere.
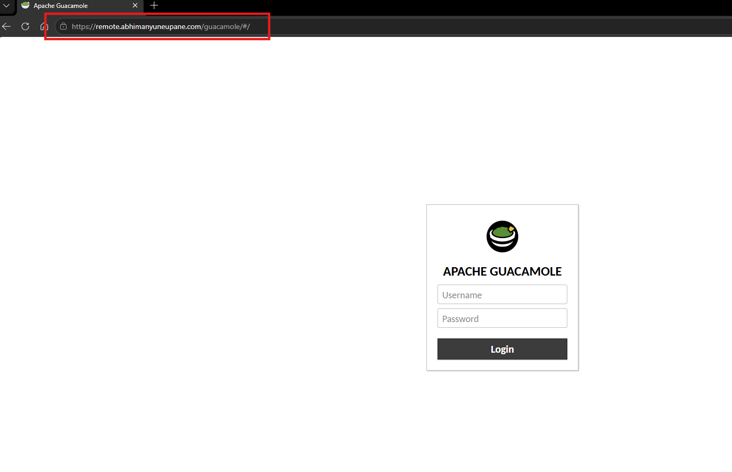
15. Final result
After putting everything together, I had a working Apache Guacamole environment running on Ubuntu.
I could access the web interface through my own domain: https://remote.abhimanyuneupane.com
The setup gave me a simple way to access my VMware Workstation virtual machines through a browser without needing to expose my home network directly.
I also liked that everything was running through Docker. It makes the environment easier to manage, troubleshoot, and rebuild when needed.
This is still a personal lab project, and there are plenty of things I can improve over time. But getting Guacamole running locally and then making it accessible through Cloudflare Tunnel was a good starting point.
Hopefully, this walkthrough helps someone building a similar home lab.
Useful documentation
https://guacamole.apache.org/doc/gug/guacamole-docker.html